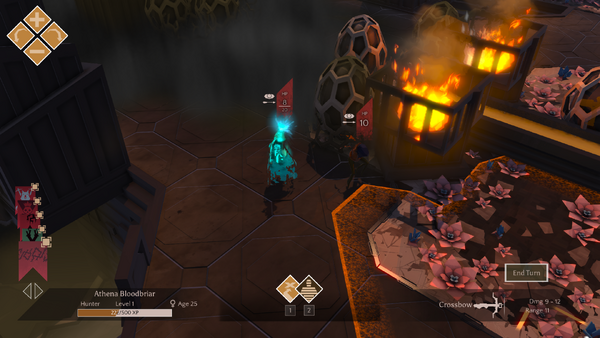
Tactical is a main gameplay mode of Massive Chalice. In the strategic mode of the game, the ruler manages the affairs the nation, largely aimed toward developing a retinue from which a sufficiently strong vanguard can be formed to fend off a Cadence attack. In the tactical mode, the five heroes selected for the vanguard actually attempt to fend off such an attack under the tactical direction of the ruler.
Turn-based combat[ | ]
The combat is turn-based, with the vanguard getting its turn first, followed by the Cadence getting their turn. Units on a given side can act in any order desired during their turn.
Unless the creatures discover the heroes, they are in "sleep" mode: They will not attack on their own, unless provoked. As such, scouting needs to be done smartly - getting too far ahead can result in the heroes being overwhelmed by the sheer volume of monsters. On the other hand, a hidden scout can be an asset, spotting targets for alchemists and their hybrid classes to bombard.
Action points[ | ]
During a turn, each unit starts with two action points. Movement over a short distance, to a tile highlighted orange, only consumes one action point and generally leaves all other actions available. Movement to a tile that is highlighted white will consume both action points, and the unit can do nothing else that turn. Nearly all other actions, such as attacks, consume all remaining action points. Note that spending an action point doesn't prevent switching to and having another unit act, and the remaining action point remains available until the end of the turn.
Note that the "End turn" button simply consumes the remaining action points of the currently selected unit. The turn does not actually end until all units have consumed their action points.
Fog of war[ | ]
Units can only see so many tiles distant. When first entering the battle, everything out of the sight of the vanguard is completely obscured by the fog of war, even the terrain. As the heroes move around the battlefield and see more of it, previously seen terrain will no longer be obscured, but only enemy units within sight of the heroes will be seen.
This can make careful scouting particularly important. It may be of little threat to be surprised by a few Seeds, but accidentally getting close to a Wrinkler or Twitcher can be very dangerous.
Tactical Pointers[ | ]
- There is generally little-to-no benefit gained from expending both of a hero's action points in a single move (in fact, it's more often a detriment). When advancing into the Fog and around obstacles, the safest approach is to move all of your heroes by only one action point per turn. This allows you to "back out" and essentially replay the turn if something nasty is uncovered. NOTE: This also applies to heroes with Stealth when moving around obstacles, since random movement of an enemy from around that obstacle may reveal your hero.
- Anticipate enemy's movements. Enemies move using one action point at a time. If their first move puts them in range of a hero, they will move/attack towards it with their second. For example, if a hero is 11 tiles from a Lapse, that Lapse needs to move in the hero's direction by just 1 tile to be in visible range -- after which it will close in 4 more tiles and attack at range. A "safe distance" is Sight + Speed + 1 (15 in this case).
- Melee units can be "pulled" by moving inside their range of Vision but outside their range of movement. For example, a Rupture has a speed of 3 and can thus move 6 tiles. Moving exactly 8 tiles away will pull it within one tile of the visible hero.
- Enemies will often "chase" your hero. If they know a hero's general location from a previous turn or action, they tend to move in that direction. Be mindful of this if you think your hero is in a good hiding place and when you're attempting to pull units.
- Blinding Shot reduces an enemy's Vision to 1. A blinded enemy can still see an adjacent hero.
- Blinded enemies move randomly. Sometimes, you'll get lucky and have them run away from your Vanguard.
- Stun effects don't prevent enemies from acting as Spotter to a Twitcher.
- Have a backup plan to your backup plan. Even 95% chance attacks can miss, so always consider the consequences of a miss on high-priority targets and how you'll handle it. For example, if you have two 'jacks and intend to kill a Seed and stun a Rupture, kill the Seed last, just in case the stun misses, and you need to change the plan.
- Use the environment (including allies & enemies) creatively to your full advantage, especially around knockback effects. For example, when killing a Lapse, its dying knockback explosion can push enemies into obstacles and/or push your hero into a hiding spot. When no obstacles/enemies are available, a hero can be positioned to proc a stun -- which also works with the Enforcer's knockback arrow.
- Be patient when addressing large groups. There's no penalty for simply ending your turn without action, while rushing in will often just get heroes killed. Enemies will eventually "peel off" from the group and present themselves as easy/manageable/pullable targets.

